Offline Traders
Using Offline Traders
On the Avelon 1.3.6 server, you can utilize the offline trading feature, allowing your character to continue trading even after you've logged out of the game.
Activate Offline Trading
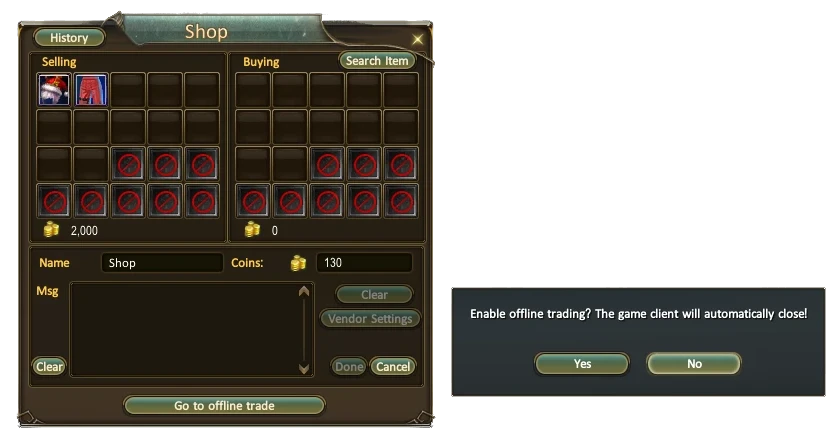
- Open the trade window and set up your shop
- After configuring your shop, click the "Go to Offline Trade" button
- Your character will log out, but the shop will remain active in the game world
Important Restrictions
- Only one offline trader can be active per account at any given time
- The offline trading feature is free and available to all players without restrictions
Utilize offline trading to efficiently sell items and earn profits even when you're not actively playing.
Arena of Archosaur
Basic information
Arena of Archosaur is a PvP/PvE event. The center of the arena contains a group of chests, in which generous rewards are hidden. This is a location open to all players who have reached level 50, but caution should be exercised. The Arena is a PvP zone, where other players can pose a deadly threat!
Time of the event
- The event runs on Saturdays from 16:00 to 18:00 server time
- Event duration - 2 hours
Limits
- From character level 50 and above
Entrance and location
- To get into the arena you need to go to the Arena Manager NPC and take the quest to enter
- In the center of the map there is a free PvP zone
- With the start of the event, several types of chests appear in the center of the main hall in the arena
- They all have the same model and name - but contain different rewards
- One of the chests, after digging, summons the boss Sentry Adalblader
Rewards and drops
Boss Drop
- Chance of 3 items dropping - 100%
- Drop cycles - 10
- Total: 30 items
Possible drop
- 6%
 Average Garnet Shard 5 lvl
Average Garnet Shard 5 lvl
Average Garnet Shard 5 lvl
Price 800
A soulgem filled with mystical power.
Can be imbued to Lv.5 or higher equipment.
Imbue at a blacksmith.
To a weapon: Physical attack +16
To armor: Physical defense +26 - 6%
 Average Sapphire Shard 5 lvl
Average Sapphire Shard 5 lvl
Average Sapphire Shard 5 lvl
Price 800
A soulgem filled with mystical power.
Can be imbued to Lv.5 or higher equipment.
Imbue at a blacksmith.
To a weapon: Magic attack +16
To armor: Magic defense +21 - 6%
 Average Amber Shard 5 lvl
Average Amber Shard 5 lvl
Average Amber Shard 5 lvl
Price 800
A soulgem filled with mystical power.
Can be imbued to Lv.5 or higher equipment.
Imbue at a blacksmith.
To a weapon: Accuracy +50
To armor: Evasion +26 - 6%
 Average Turquoise Shard 5 lvl
Average Turquoise Shard 5 lvl
Average Turquoise Shard 5 lvl
Price 800
A soulgem filled with mystical power.
Can be imbued to Lv.5 or higher equipment.
Imbue at a blacksmith.
To a weapon: Mana +40
To armor: Mana +40 - 6%
 Average Citrine Shard 5 lvl
Average Citrine Shard 5 lvl
Average Citrine Shard 5 lvl
Price 800
A soulgem filled with mystical power.
Can be imbued to Lv.5 or higher equipment.
Imbue at a blacksmith.
To a weapon: HP +25
To armor: HP +25 - 6%
 Beautiful Alabaster Shard 6 lvl
Beautiful Alabaster Shard 6 lvl
Beautiful Alabaster Shard 6 lvl
Price 1,100
A soulgem filled with mystical power.
Can be imbued to Lv.6 or higher equipment.
Imbue at a blacksmith.
To a weapon: Metal attack +40
To armor: Metal resistance +52 - 6%
 Beautiful Aquamarine Shard 6 lv
Beautiful Aquamarine Shard 6 lv
Beautiful Aquamarine Shard 6 lv
Price 1,100
A soulgem filled with mystical power.
Can be imbued to Lv.6 or higher equipment.
Imbue at a blacksmith.
To a weapon: Wood attack +40
To armor: Wood resistance +52 - 6%
 Beautiful Amethyst Shard 6 lvl
Beautiful Amethyst Shard 6 lvl
Beautiful Amethyst Shard 6 lvl
Price 1,100
A soulgem filled with mystical power.
Can be imbued to Lv.6 or higher equipment.
Imbue at a blacksmith.
To a weapon: Water attack +40
To armor: Water resistance +52 - 6%
 Beautiful Ruby Shard 6 lvl
Beautiful Ruby Shard 6 lvl
Beautiful Ruby Shard 6 lvl
Price 1,100
A soulgem filled with mystical power.
Can be imbued to Lv.6 or higher equipment.
Imbue at a blacksmith.
To a weapon: Fire attack +40
To armor: Fire resistance +52 - 6%
 Beautiful Topaz Shard 6 lvl
Beautiful Topaz Shard 6 lvl
Beautiful Topaz Shard 6 lvl
Price 1,100
A soulgem filled with mystical power.
Can be imbued to Lv.6 or higher equipment.
Imbue at a blacksmith.
To a weapon: Earth attack +40
To armor: Earth resistance +52 - 2,5%
Flawless Garnet Shard 7 lvl
Flawless Garnet Shard 7 lvl
Price 1,800
A soulgem filled with mystical power.
Can be imbued to Lv.7 or higher equipment.
Imbue at a blacksmith.
To a weapon: Physical attack +25
To armor: Physical defense +41 - 2,5%
Flawless Sapphire Shard 7 lvl
Flawless Sapphire Shard 7 lvl
Price 1,800
A soulgem filled with mystical power.
Can be imbued to Lv.7 or higher equipment.
Imbue at a blacksmith.
To a weapon: Magic attack +25
To armor: Magic defense +33 - 2,5%
Flawless Amber Shard 7 lvl
Flawless Amber Shard 7 lvl
Price 1,800
A soulgem filled with mystical power.
Can be imbued to Lv.7 or higher equipment.
Imbue at a blacksmith.
To a weapon: Accuracy +80
To armor: Evasion +41 - 2,5%
Flawless Citrine Shard 7 lvl
Flawless Citrine Shard 7 lvl
Price 1,800
A soulgem filled with mystical power.
Can be imbued to Lv.7 or higher equipment.
Imbue at a blacksmith.
To a weapon: HP +40
To armor: HP +40 - 10%
 Mirage Celestone
Mirage Celestone
Mirage Celestone
Lv. 15
Price 10,000
The most powerful medium of Chi in Perfect World.
Can be used to refine your equipment at any Elder
or trade for Dice Tickets in the Cube of Fate. - 3%
 Badge of Strength
Badge of Strength
Badge of Strength
Price 500
Strength makes you supreme!
Requisite Lv: 1
Exchange it for 2000 Spirit from the messenger of sages
You can also exchange 10 badges for one sign.
Can be exchaned at NPC 'Messenger of the Sages' - 5%
 Wraith Officer's Badge
Wraith Officer's Badge
Wraith Officer's Badge
Price 100
Badge of a Wraith officer.
Take this to the Commander-in-chief to gain 25 Reputation. - 1%
Immaculate Sapphire Shard 8 lvl
Immaculate Sapphire Shard 8 lvl
Price 2,500
A soulgem filled with mystical power.
Can be imbued to Lv.8 or higher equipment.
Imbue at a blacksmith.
To a weapon: Magic attack +32
To armor: Magic defense +42 - 1%
Immaculate Citrine Shard 8 lvl
Immaculate Citrine Shard 8 lvl
Price 2,500
A soulgem filled with mystical power.
Can be imbued to Lv.8 or higher equipment.
Imbue at a blacksmith.
To a weapon: HP +50
To armor: HP +50 - 1%
Immaculate Garnet Shard 8 lvl
Immaculate Garnet Shard 8 lvl
Price 2,500
A soulgem filled with mystical power.
Can be imbued to Lv.8 or higher equipment.
Imbue at a blacksmith.
To a weapon: Physical attack +32
To armor: Physical defense +53 - 7%
 Mysterious Chip
Mysterious Chip
Mysterious Chip
Doesn't drop on death.
Unable to be discarded
Unable to be traded
Unable to be put into Account Stash
Collect to trade special items at Mysterious Merchant's.
Unable to be traded among players or discarded. Does not drop upon death. - 2%
 Golden Egg
Golden Egg
Golden Egg
Brings a surprise to your equipment refining.
Chance to contain a 1, 2, or 3 Star Dragon Orb
or 1 Mirage Celestone.
Right click to open.
●Press Ctrl + X to view content.
Mob drop
-
Badge of Strength
Badge of Strength
Price 500
Strength makes you supreme!
Requisite Lv: 1
Exchange it for 2000 Spirit from the messenger of sages
You can also exchange 10 badges for one sign.
Can be exchaned at NPC 'Messenger of the Sages'
Chest #1
- 50%
Badge of Strength
Badge of Strength
Price 500
Strength makes you supreme!
Requisite Lv: 1
Exchange it for 2000 Spirit from the messenger of sages
You can also exchange 10 badges for one sign.
Can be exchaned at NPC 'Messenger of the Sages' - 50%
Badge of Wisdom
Badge of Wisdom
Price 1,000
Wisdom is the most valuable of virtues!
Requisite Lv: 1
Exchange it for 1000 Spirit from the Messenger of Sages
You can also exchange 10 badges for one sign.
Can be exchaned at NPC 'Messenger of the Sages'
Chest #2
- 33,33%
Badge of Strength
Badge of Strength
Price 500
Strength makes you supreme!
Requisite Lv: 1
Exchange it for 2000 Spirit from the messenger of sages
You can also exchange 10 badges for one sign.
Can be exchaned at NPC 'Messenger of the Sages' - 33,33%
Badge of Courage
Badge of Courage
Price 500
Never surrender
Requisite Lv: 80
Exchange it for 8000 Spirit from the messenger of sages
You can also exchange 10 badges for one sign.
Can be exchaned at NPC 'Messenger of the Sages' - 33,33%
Badge of Endurance
Badge of Endurance
Price 500
Endurance makes you dependable!
Requisite Lv: 60
Exchange it for 6000 Spirit from the Messenger of Sages
You can also exchange 10 badges for one sign.
Can be exchaned at NPC 'Messenger of the Sages'
Chest #3
- 6,25%
Average Amber Shard 5 lvl
Average Amber Shard 5 lvl
Price 800
A soulgem filled with mystical power.
Can be imbued to Lv.5 or higher equipment.
Imbue at a blacksmith.
To a weapon: Accuracy +50
To armor: Evasion +26 - 6,25%
Average Citrine Shard 5 lvl
Average Citrine Shard 5 lvl
Price 800
A soulgem filled with mystical power.
Can be imbued to Lv.5 or higher equipment.
Imbue at a blacksmith.
To a weapon: HP +25
To armor: HP +25 - 6,25%
Average Sapphire Shard 5 lvl
Average Sapphire Shard 5 lvl
Price 800
A soulgem filled with mystical power.
Can be imbued to Lv.5 or higher equipment.
Imbue at a blacksmith.
To a weapon: Magic attack +16
To armor: Magic defense +21 - 6,25%
Average Garnet Shard 5 lvl
Average Garnet Shard 5 lvl
Price 800
A soulgem filled with mystical power.
Can be imbued to Lv.5 or higher equipment.
Imbue at a blacksmith.
To a weapon: Physical attack +16
To armor: Physical defense +26 - 6,25%
Average Turquoise Shard 5 lvl
Average Turquoise Shard 5 lvl
Price 800
A soulgem filled with mystical power.
Can be imbued to Lv.5 or higher equipment.
Imbue at a blacksmith.
To a weapon: Mana +40
To armor: Mana +40 - 2%
 Mysterious Chip 10-Pack
Mysterious Chip 10-Pack
Mysterious Chip 10-Pack
This pack contains 10 Mysterious Chips.
These chips will bind to you when the pack is opened.
Right-click to open this pack.
To quickly open large quantities of these packs, talk to the
Mysterious Merchant in the City of a Thousand Streams.
He accepts the following quantities:
- 50 packs for 500 Mysterious Chips
- 100 packs for 1,000 Mysterious Chips.
●Press Ctrl + X to view content. - 6,25%
Mysterious Chip
Mysterious Chip
Doesn't drop on death.
Unable to be discarded
Unable to be traded
Unable to be put into Account Stash
Collect to trade special items at Mysterious Merchant's.
Unable to be traded among players or discarded. Does not drop upon death. - 2%
Golden Egg
Golden Egg
Brings a surprise to your equipment refining.
Chance to contain a 1, 2, or 3 Star Dragon Orb
or 1 Mirage Celestone.
Right click to open.
●Press Ctrl + X to view content. - 6,25%
 Dice Ticket
Dice Ticket
Dice Ticket
Item for Cube of Fate Challenge.
Trade it for a Die. Can be made from a Mirage Celestone. - 10%
 Perfect Teleport Stone
Perfect Teleport Stone
Perfect Teleport Stone
Price 1
Doesn't drop on death.
Unable to be discarded
Unable to be traded
Unable to be put into Account Stash
Perfect Teleport Stone.
Can teleport you to an open teleportation point in the Ideal World.
Right-click on the item to use it. Only works outside of combat. - 7,25%
 Resurrection Scroll
Resurrection Scroll
Resurrection Scroll
Price 2,000
Doesn't drop on death.
Put in Inventory to revive yourself at where you died. - 7,25%
 Sesame Oil
Sesame Oil
Sesame Oil
Food Type Pure Water
Price 1
Sesame oil that smells great.
Feed it to your Pet to increase its Loyalty by 100. - 7,25%
 Fruit
Fruit
Fruit
Fruit
Food Type Fruit
Price 1
Tasty berries.
Feed them to your Pet to increase its Loyalty by 50. - 7,25%
 Venison
Venison
Venison
Food Type Meat
Price 1
Venison
Feed it to your Pet to increase its Loyalty by 250. - 6%
Mirage Celestone
Mirage Celestone
Lv. 15
Price 10,000
The most powerful medium of Chi in Perfect World.
Can be used to refine your equipment at any Elder
or trade for Dice Tickets in the Cube of Fate. - 7,25%
 Do-all Card
Do-all Card
Do-all Card
An amazing card of the cube. Can be used to trade
for Robber Card and Bully Card in Cube of Fate.
Can be taken out of Cube of Fate. - Chance of dropping 1 item - 80%
- Chance of dropping 3 items - 20%
Chest #4
- 4,17%
 High-carbon Steel
High-carbon Steel
High-carbon Steel
Price 170
Low grade metal for producing equipment. - 4,17%
 Refined Steel
Refined Steel
Refined Steel
Price 360
Mid-grade metal for producing equipment. - 4,17%
 Rough Lumber
Rough Lumber
Rough Lumber
Price 170
Low grade lumber for producing equipment. - 4,17%
 Fine Lumber
Fine Lumber
Fine Lumber
Price 360
Mid-grade lumber for producing equipment. - 4,17%
 Coal
Coal
Coal
Coal
Price 170
Low grade power source for producing equipment. - 4,17%
 Anthracite
Anthracite
Anthracite
Price 360
Mid-grade power source for producing equipment. - 4,17%
 Gravel
Gravel
Gravel
Price 170
Low grade finish used to produce equipment. - 4,17%
 Rubstone Powder
Rubstone Powder
Rubstone Powder
Price 360
Mid-grade finish used to produce equipment. - 8,33%
 Rough Fur
Rough Fur
Rough Fur
Price 85
Low grade leather for producing equipment. - 8,33%
 Leather
Leather
Leather
Price 180
Mid-grade leather for producing equipment. - 8,33%
 Concentrated Glue
Concentrated Glue
Concentrated Glue
Price 85
Low grade paste for producing equipment. - 8,33%
 Strong Glue
Strong Glue
Strong Glue
Price 180
Mid-grade paste for producing equipment. - 8,33%
 Purified Oil
Purified Oil
Purified Oil
Price 85
Low grade oil for producing equipment. - 8,33%
 Compound Oil
Compound Oil
Compound Oil
Price 180
Mid-grade oil for producing equipment. - 8,33%
 Silk Thread
Silk Thread
Silk Thread
Price 85
Low grade textile for producing equipment. - 8,33%
 Compound Thread
Compound Thread
Compound Thread
Price 180
Mid-grade textile for producing equipment. - Chance of dropping 2 items - 80%
- Chance of dropping 5 items - 20%
Chest #5
- 10%
Beautiful Garnet Shard 6 lvl
Beautiful Garnet Shard 6 lvl
Price 1,100
A soulgem filled with mystical power.
Can be imbued to Lv.6 or higher equipment.
Imbue at a blacksmith.
To a weapon: Physical attack +20
To armor: Physical defense +33 - 10%
Beautiful Sapphire Shard 6 lvl
Beautiful Sapphire Shard 6 lvl
Price 1,100
A soulgem filled with mystical power.
Can be imbued to Lv.6 or higher equipment.
Imbue at a blacksmith.
To a weapon: Magic attack +20
To armor: Magic defense +23 - 10%
Beautiful Turquoise Shard 6 lvl
Beautiful Turquoise Shard 6 lvl
Price 1,100
A soulgem filled with mystical power.
Can be imbued to Lv.6 or higher equipment.
Imbue at a blacksmith.
To a weapon: Mana +52
To armor: Mana +52 - 10%
Beautiful Citrine Shard 6 lvl
Beautiful Citrine Shard 6 lvl
Price 1,100
A soulgem filled with mystical power.
Can be imbued to Lv.6 or higher equipment.
Imbue at a blacksmith.
To a weapon: HP +32
To armor: HP +32 - 7,5%
Flawless Citrine Shard 7 lvl
Flawless Citrine Shard 7 lvl
Price 1,800
A soulgem filled with mystical power.
Can be imbued to Lv.7 or higher equipment.
Imbue at a blacksmith.
To a weapon: HP +40
To armor: HP +40 - 7,5%
Flawless Sapphire Shard 7 lvl
Flawless Sapphire Shard 7 lvl
Price 1,800
A soulgem filled with mystical power.
Can be imbued to Lv.7 or higher equipment.
Imbue at a blacksmith.
To a weapon: Magic attack +25
To armor: Magic defense +33 - 7,5%
Flawless Garnet Shard 7 lvl
Flawless Garnet Shard 7 lvl
Price 1,800
A soulgem filled with mystical power.
Can be imbued to Lv.7 or higher equipment.
Imbue at a blacksmith.
To a weapon: Physical attack +25
To armor: Physical defense +41 - 5%
Immaculate Sapphire Shard 8 lvl
Immaculate Sapphire Shard 8 lvl
Price 2,500
A soulgem filled with mystical power.
Can be imbued to Lv.8 or higher equipment.
Imbue at a blacksmith.
To a weapon: Magic attack +32
To armor: Magic defense +42 - 5%
Immaculate Garnet Shard 8 lvl
Immaculate Garnet Shard 8 lvl
Price 2,500
A soulgem filled with mystical power.
Can be imbued to Lv.8 or higher equipment.
Imbue at a blacksmith.
To a weapon: Physical attack +32
To armor: Physical defense +53 - 5%
Immaculate Citrine Shard 8 lvl
Immaculate Citrine Shard 8 lvl
Price 2,500
A soulgem filled with mystical power.
Can be imbued to Lv.8 or higher equipment.
Imbue at a blacksmith.
To a weapon: HP +50
To armor: HP +50 - 22,5%
Golden Egg
Golden Egg
Brings a surprise to your equipment refining.
Chance to contain a 1, 2, or 3 Star Dragon Orb
or 1 Mirage Celestone.
Right click to open.
●Press Ctrl + X to view content. - Chance to drop 1 item - 100%
Nation War
Basic information
Nation War is an automatic PvP event with its own features, which will be discussed below.
Time of the event
- Nation War takes place every week on Friday and Sunday from 20:20 to 21:20 server time
- You can find out the server time by opening the calendar near the minimap
Entrance and location
At 20:20 Overseer Aeban gives a quest to enter the event. After entering, everyone finds themselves in the starting location of their nation (determined randomly), where skills do not work, it is impossible to fly and use the genie. In this location, no one can see anyone, although party members will be visible on the map. The base is the only invulnerable location at the event (it cannot be attacked). There is an NPC here - you can buy pots from him, repair your gear and leave the event.
If you open your map, you will see
- Numbered territories
- Movement: to move, you need to click on the desired territory - belonging to your nation or bordering it (in the first case, you will become a defender, in the second - an attacker)
- While the character is moving, it is invulnerable (visually it is standing on the base), at this time you cannot close the map
- If a battle happens on the way, and there is a place for you - you get to the battle, otherwise the character will be thrown back to the previous territory
- On the right, there are buttons to go back to the base, update your score and chat (you cannot close the map while your character is moving between maps)
When moving to a location where there is no battle, players get to an intermediate territory - a square fenced area where you can repair your equipment, leave the event, or trade something. The zone is safe, accessible only to the owner of the territory. When attacking the zone, everyone in the square is thrown onto the battlefield (within 20 people).
Types of territories
Capture the flag
There are three altars on this map, a flag will spawn, randomly, on one of them. A message will appear in the center of your screen when a flag spawn. The players' task is to dig up this flag and take it to the altar belonging to your nation (red for the attacking nation, blue for the defenders). You can see the color of the altar by opening the map (M).
Each battlefield can have 20 players on each side (40 in total). The battle for territory lasts up to 25 minutes or up to 20 points. Points and the number of players on the battlefield are displayed in a special counter. When a flag is dug up, the side that dug it up gets 1 point. When the flag is taken to the altar, the side that took it gets 10 points for it.
When someone is carrying the flag, they receive a special status and a sign above the character's head.
While carrying the flag, you can
- attack enemies
- heal
- use buffs
- control the enemy
- use a pots
- get movement speed from your own or other people's buffs
- the flag carrier gets a +20% health buff, but their speed is reduced by 50%
While carrying the flag, you cannot
- use a genie
- fly away
- hide in invisibility
- use mount
- use embrance
Battle for the Crystals
You appear in a territory where there are 5 initially neutral crystals. Your task is to dig up these crystals and get points for each of them. As soon as you dig up a crystal, it acquires a characteristic color: red or blue, depending on whether your nation is attacking or defending the territory. The more crystals your nation owns, the more points you get. The battle continues until one of the sides has 99 points. The side that scores 99 points wins.
Battle on the Bridge
You appear on a territory where there are 3 towers on each side. Your task is to destroy the enemy towers faster than they destroy your towers. In place of the destroyed tower, another one will appear up to 3 times. In total, you will need to kill 9 towers to win. Each enemy tower imposes debuffs on your character, their type depends on the type of tower:
- sleep
- silence
- immobilization
- slowdown
- aps and channelling reduction
- decrease in physical and magical defense
- decrease in chi reserves
- stunning
- increases the damage you take
Conclusion
At the end of the battle for a certain zone, its overall and your personal result are displayed in the chat. This result depends on
- the number of players you killed
- the damage you received and the health you restored
- the time spent on the battlefield
- the total time of the battle
- the number of people present
- your side's victory or defeat (both will receive their points, but the losers will receive fewer)
If you click the "Refresh" button on the right of the large map, your personal result and the number of players fighting for each nation will be updated. At the end of the event, all players are shown its results in a special window. The reward is called "Supply Tokens" and comes to the player's mailbox shortly after the end of the event (on average, within 5 minutes). If Supply Tokens are shown at the bottom of the screen that appears after the end of the event, the specified amount will be sent to the mail, if there are 0, you will not receive anything, which is reported in the letter that comes to the mail in this case. Most people still get the reward, but if you afk for a long time or exit almost immediately after the start, you can be left without a reward.
Arigora
Basic information
Arigora is a PvP event that will be added to the server some time after the start. Initially, only 1x1 mode with automatic selection of an opponent will be available.
Time of the event
- The event schedule will be added later...
Registration for the event
- To take part in the event, you need to go to the NPC "Arigora Agent Khroatis" (531 635 Main Map) at the time specified above and register a fight with it
- To start searching for an opponent, click "Enter Matchmaking" and select the 1x1 mode (Personal Matchmaking)
- When the enemy is found, a notification about this will appear in the center of the screen. You will need to confirm your readiness to enter the battle, after which you will be teleported to a separate location (arena)
- You will have approximately 75 seconds to confirm your readiness to enter the battlefield
- If you do not have time to confirm your readiness, you will automatically be considered a loser and your opponent will be considered a winner
- There is no point in using buffs from other classes before starting to search for opponents. After teleporting to the arena for battle, all your buffs will be removed
- After entering the arena, you can use your own buffs or pots
- After entering the arena, you will have time to prepare for the upcoming battle: see the nickname of the enemy, use your buffs and accumulate chi
- After the battle is over, depending on your victory or defeat, you either gain points or lose them
To open Arigora's interface, you need to use the key combination ALT+J or the action panel.
Reward
- Minimum requirements to receive a qualifying (weekly) reward:
- Take part in 10 battles (it doesn't matter whether it's a victory or a defeat)
- The qualification award will be sent to your mail immediately after the end of the 10th battle
- You receive the item "Order of Arigora"
- This item can be exchanged for a reward from NPC Royal Knight Hector (531 636 Main Map)
- Rating Award:
- To get in the rankings you need to have more than 1400 points (you can see the number of your points after 10 battles and by pressing the key combination Alt + J)
- Depending on your ranking, you will receive a certain number of "Emblem of Arigora", which can also be exchanged for rewards at NPC Royal Knight Hector
- The reward in the form of "Emblem of Arigora" is given out on Monday at 3:00 server time
- In order to receive a reward you need to have at least 10 battles each week
Tournament Event
Basic information
Tournament is a PvP event that is available to characters level 40 and above.
Time of the event
- The event schedule will be added later...
To participate, you need to have 100,000 with you and go to one of the following NPCs at the time specified above:
- 434, 887
- 328, 429
- 250, 469
- 529, 663
- 131, 858
Since this is a PvP event, you should prepare for the fights: charm, pots. So, the event exists for several categories, for different-level players:
- 40-49
- 50-59
- 60-69
- 70-79
- 80-89
- 90+
Entrance and location
At 20:00 we approach any of their NPCs at the above coordinates. Take the quest from the NPC, and also do not forget 100,000 coins, after which you will be teleported to a large hall that looks like the Cube location. In this starting location, you will have to wait 5 minutes, after which chests will appear throughout the room. You need to dig up one of the chests, after which you will have a pass - this means that you are now a participant in the event. This room is not a PvP zone.
After another 5 minutes, NPCs "Tournament Inspector" will appear in the 4 corners of the central square of the room, who will take your pass and 100,000 coins and transfer you to the 1/8 room of the event. Depending on the number of participants, you may be sent to a room with up to 12 people or not at all. Players are randomly distributed into 2 corners, where NPCs stand and heal all participants for the first 15 seconds (the heal does not reach the center of the room, be careful) P.S. Do not think that you cannot be killed during the heal, so be doubly careful.
When the heal is over, you will have about 5 minutes before the chests appear, you will need to dig one of them, then there will be another 5 minutes before the Tournament Inspector appears. After completing the quest for the dug chest, the NPC will send you to the next stage of the competition, which is no different from the previous one except for the reward for the dug chest, the only exceptions are the final stages (huge room + chests for different prize places) and semi-finals (larger room size).
It's time to find out in which case you are eliminated from the event:
- If you died, you are eliminated
- If you did not dig up the chest before the NPC appeared, you are eliminated
- If you dug up the chest, but died before the NPC appeared, you are eliminated
- If you did not hand in the quest to the NPC within 5 minutes after it appeared, you are eliminated
Now let's look at the number of stages of this event, there are 4 stages in total: 1/8, 1/4, semi-final and final, the number of players in the rooms does not change, only the reward changes, and the size of the rooms starting from the semi-final, but in the final you will find 6 chests, which are not equal to each other as in other stages:
- 1 chest for first place
- 2 chests for second places
- 3 chests for third places
Reward
Rewards 90+
- 1st place
-
 Championship Scroll
Championship Scroll
Championship Scroll
Proof given to tournament champions.
Can be exchanged for warsouls at the Tournament Agent or Jolly Old Jones.
It can also be given to the Elder of Archosaur in exchange for a helm.
Can be exchanged at Thursday Night Fight Agent
●Press Ctrl + H to view price history. -
 Dragon Orb (6 Star)
Dragon Orb (6 Star)
Dragon Orb (6 Star)
Price 100
100% chance to successfully increase an item's refinement level by 1.
Can be used to make higher rank Dragon Orbs at a Jewelcraftsman.
Maximum refinement level: +6 - Exp: 4 000 000
- SP: 800 000
- Reputation: 1000
- Event Gold: 14
-
- 2nd place
- x45
 Warsoul Tag
Warsoul Tag
Warsoul Tag
Price 10,000
Unable to be discarded
Unable to be traded
A tag bathed by the will of great fighters.
Can exchange for reward from NPC in the Tournament. -
 Dragon Orb (4 Star)
Dragon Orb (4 Star)
Dragon Orb (4 Star)
Price 100
100% chance to successfully increase an item's refinement level by 1.
Can be used to make higher rank Dragon Orbs at a Jewelcraftsman.
Maximum refinement level: +4 - Exp: 3 000 000
- SP: 600 000
- Reputation: 750
- Event Gold: 9
- 3rd place
- x36
Warsoul Tag
Warsoul Tag
Price 10,000
Unable to be discarded
Unable to be traded
A tag bathed by the will of great fighters.
Can exchange for reward from NPC in the Tournament. -
 Dragon Orb (3 Star)
Dragon Orb (3 Star)
Dragon Orb (3 Star)
Price 100
100% chance to successfully increase an item's refinement level by 1.
Can be used to make higher rank Dragon Orbs at a Jewelcraftsman.
Maximum refinement level: +3 - Exp: 1 600 000
- SP: 300 000
- Reputation: 500
- Event Gold: 5
Snake Isle
Basic information
If you like the spirit of racing and competition, and your mount is already tired of running between daily tasks, then this auto-event will suit you! You can participate in Snake Isle starting from character level 40.
Time of the event
- The event runs every day from 19:15 to 19:30 and from 3:45 to 4:00
Entrance and location
To get to the island, approach the NPC Khatru Pup or Adventure Assistant, which can be found in all major cities. The entrance to Snake Isle opens 15 minutes before the event starts and closes immediately after the start. Up to 50 characters can enter the location.
When you enter the location, you will find yourself near a small house, and there will be blue flags not far from you. Go to them and wait for the start. You can only participate in the race on a riding pet (any). The time spent on the island is 30 minutes. If you do not have time to run the race, you will be thrown out of the location and the task will be considered failed.
Features of the event
The race will start at exactly 19:30 and 4:00 server time. Take the 'Snake Island Race' quest from an NPC or any flagpole and run in the direction of the arrows. You will have to run 3 laps, each of which will pass 5 checkpoints. Please note that the 5th point is the starting point. To "pass" a checkpoint, you need to run near a large flag with the name of the point.
In addition to checkpoints, you will encounter various spheres on your way. Each of them has a certain effect on your character.
| Purple sphere | Blue sphere | White sphere | Yellow sphere |
|---|---|---|---|
| Acceleration of movement (up to 15 m/s) | Slowdown (up to 6.6 m/s) | Immobilization | Stun |
After you reach checkpoint 5 of the third circle, hand in the quest to the NPC or one of the flagpoles.
Reward
Participation Reward
- Coins: 60,000
- Exp: 100 000
- SP: 50 000
- Reputation: 50
- Event Gold: 1
- х15
Mysterious Chip
Mysterious Chip
Doesn't drop on death.
Unable to be discarded
Unable to be traded
Unable to be put into Account Stash
Collect to trade special items at Mysterious Merchant's.
Unable to be traded among players or discarded. Does not drop upon death. - х1 - 3%
Badge of Speed
Badge of Speed
Price 500
The speed of wind is the pursuit of everybody!
Requisite Lv: 1
Exchange it for 2000 Spirit from the messenger of sages
You can also exchange 10 badges for one sign.
Can be exchaned at NPC 'Messenger of the Sages'
First Place Award
- Coins: 200,000
- Exp: 250 000
- Reputation: 200
- Event Gold: 3
- х6
Mirage Celestone
Mirage Celestone
Lv. 15
Price 10,000
The most powerful medium of Chi in Perfect World.
Can be used to refine your equipment at any Elder
or trade for Dice Tickets in the Cube of Fate. - х1
Badge of Speed
Badge of Speed
Price 500
The speed of wind is the pursuit of everybody!
Requisite Lv: 1
Exchange it for 2000 Spirit from the messenger of sages
You can also exchange 10 badges for one sign.
Can be exchaned at NPC 'Messenger of the Sages'
Starter Guide
Where to start
- Register an account if you haven't already
- A more useful solution would be to ask a friend who's already registered with us for a referral link. Read more about the referral system
- Create a character by choosing a class in advance
- Below we will tell you more about character classes
- First levels (1–30)
- Complete quests in the starting location
- Use auto-pathing to avoid getting lost
- Equipment
- At the first levels, quest gear is enough
- Don't rush to spend resources on upgrades – the main investments come from level 60+
Character classes and their features
Blademaster
- Role: Universal damage dealer/tank. Good solo and in a squad
- Tips:
- In PvE, you can tank mobs and bosses
- In PvP, stun the enemy → finish off the combo
Wizard
- Role: Highest damage output in the game, but low survivability
- Tips:
- Keep enemies at bay
- Always have pots
- In PvP: combo of control effects + burst damage
Barbarian
- Role: Best Tank
- Tips:
- Make sure you have good gear → Your job is to hold the aggro on bosses
- In PvP, you're useful as a tank with control
- On TW, you'll most often need to carry catapult
Venomancer
- Role: All-rounder. Can deal damage, debuff, and use pets
- Tips:
- Tame a good combat pet
- In PvP, veno removes enemy buffs and is very dangerous
- In PvE, veno can solo farm almost anything
Cleric
- Role: Buffer, healer, life of the party
- Tips:
- Solo farming takes a long time, so it's best to farm in a squad
- In PvP, the number one goal is often to stay in the back, protected
- Be sure to level up your resurrection skill
Archer
- Role: Strong ranged damage, mobility
- Tips:
- In PvE, kiting mobs is easy
- In PvP, always keep your distance → stun → burst damage
- Slightly fragile at low levels, but becomes more powerful later
Path of development by levels
1–30
- Complete the starting quests → level up faster and get your basic gear
- Start developing your crafting skills (Blacksmith, Tailor, Craftsman, Apothecary)
30–60
- Join FB (19, 29, 39, 51)
- Start collecting resources for future gear
- Join a faction
60–90
- TT (Twilight Temple) opens – the main source of top-tier gear
- Complete daily quests
- PvP becomes more active → you can start learning to fight
90+
- Endgame: TT 2-3, 3-x, set farming
- Territory Wars – the main content
- Maximum skill leveling and crafting skill development
Helpful tips
- Take your time: enjoy the gradual progression
- Collect mats – they'll come in handy
- Learn to combine skills – even at low levels, this makes all the difference in PvP
- Keep an eye on your consumables: mana/HP pots are essential
- Don't ignore quests—they give a lot of experience
- Don't level up every skill at once—it's better to focus on the key ones
- There are voting links in your User Panel
- By voting for our project, you'll receive silver, which you can spend in the Boutique in your User Panel on necessary consumables, which will be especially useful at the start
- In the calendar next to the minimap, you can find a lot of useful information about the event schedule, find out the server time, and also perform a daily registration, which gives exp and sp
- Communicate with other players – PW relies heavily on teamwork
Unique advantages
- Don't forget to take advantage of the completely free bonuses and benefits
- Achievement system (looks like a pink Lotus on the screen at the top)
- For a certain number of completed quests and for reaching levels there you can receive rewards
- Hidden Chest System
- There are chests in certain locations on the map that, when dug up, can yield valuable rewards. Read more
- Achievement system (looks like a pink Lotus on the screen at the top)
- For a more comfortable start, we have developed a Starter Pack and added it to the game boutique (Usage limit: 1 time per 1 character)
- The set will cost 370 gold and will contain many useful items for a more comfortable start
- x1
 Platinum Spirit Charm
Platinum Spirit Charm
Platinum Spirit Charm
MP recovery: 1800000/1800000
Fully recovers MP when MP lower than 75%
Cooldown: 5 seconds
Price 1 - x1
 Platinum Guardian Charm
Platinum Guardian Charm
Platinum Guardian Charm
HP recovery: 1200000/1200000
Fully recovers HP when HP lower than 50%
Cooldown: 10 seconds
Price 1 - x1
 Storm Teleport Stone (30 days)
Storm Teleport Stone (30 days)
Storm Teleport Stone (30 days)
By opening this item, you will receive an 'Storm Teleport Stone' for 30 days.
It can transfer you to an open teleportation point in the Perfect World.
Right-click to open.
●Press Ctrl + X to view content. - x1
 [Auto-recovery stone - 30 days]
[Auto-recovery stone - 30 days]
[Auto-recovery stone - 30 days]
Doesn't drop on death.
Unable to be discarded
Unable to be traded
Unable to be put into Account Stash
By opening this item, you will receive an 'Auto-Recovery Stone' for 30 days.
The obtained items will be fully bound to the character.
Right-click to open.
●Press Ctrl + X to view content. - x1
 Pick Up All (30 days)
Pick Up All (30 days)
Pick Up All (30 days)
Doesn't drop on death.
Unable to be discarded
Unable to be traded
Unable to be put into Account Stash
By activating this item, you will receive the ability to use the 'Pick Up All' action (Skills - Actions).
'Pick up all ' allows you to pick up multiple items at once in a small radius around the character, but no more than once every 5 seconds.
Right-click to activate.
The remaining time from using multiple items is cumulative, but the remaining time cannot exceed 180 days.
●Press Ctrl + X to view content. - x10
 Book of Knowledge
Book of Knowledge
Book of Knowledge
By opening the book, you will gain insight for a certain period of time and receive special effects:
+100% to experience and spirit gain from killing monsters.
+5% to experience and spirit gain from completing quests.
The book's effect is unique and does not stack with other experience and spirit gain sources.
Duration: 1 hour.
Right-click to activate.
The duration of multiple item uses stacks.
●Requirements to open: - History Level: 80
●Press Ctrl + X to view content. - Rare Flyer Pack 3,3 m/s x1
- Rare Mount Pack x1
- The set will cost 370 gold and will contain many useful items for a more comfortable start
- In addition, when you make your first donation of 100 or more gold, you will receive a bonus
-
Storm Teleport Stone (7 days)
Storm Teleport Stone (7 days)
By opening this item, you will receive an 'Storm Teleport Stone' for 7 days.
It can transfer you to an open teleportation point in the Perfect World.
Right-click to open.
●Press Ctrl + X to view content. -
 Teleport Bell
Teleport Bell
Teleport Bell
Price 100
Doesn't drop on death.
Unable to be discarded
Unable to be traded
Unable to be put into Account Stash
This bell will take you anywhere.
Keep this item in your bag.
When using teleport services, you can directly transfer to any node.
The fee for direct transfer will increase based on nodes skipped.
Lasts 1 week.
-
- There's a Quiz on the in-game screen. Answer game-related questions and earn exp, sp, reputation, and
Mysterious Chip
Mysterious Chip
Doesn't drop on death.
Unable to be discarded
Unable to be traded
Unable to be put into Account Stash
Collect to trade special items at Mysterious Merchant's.
Unable to be traded among players or discarded. Does not drop upon death. - From the very start of the server, you will be able to participate in several marathons, by participating in which you can earn in-game gold
- Marathon of Reputation
- Marathon Quest
- Marathon of TW (You might be interested in this if you want to create your own guild)
Remember, our team is always happy to help! If you encounter any game-related issues, please contact our Support
City of Abominations
Basic information
City of Abominations (CoA) is a weekly PvE event that occurres every Wednesday at 20:50 server time
- Event duration up to 1 hour
- Limits: From character level 90 and above
- The cost of entering the event through NPC is 20,000 coins
Entrance and location
When it opens players have 10 minutes to enter via. the Adventure Assistant or Khatru Pup, and the entry fee is 20k. It is not a PK instance however, and there are four different instances (all of which have identical mobs/rooms). Those instances are Phoenix, Tiger, Dragon, and Tortoise. If you die in the instance you are revived in the same instance at a random corner
If you disconnect, you're kicked out without a refund
The mobs drop Astral Orbs which you can trade for prizes. To get enough orbs for the top prize ring you need 400 orbs if your instance wins and 600 orbs if your instance loses. All mobs are "?" mobs too so your damage is reduced, and their HP ranges from 1m to 3m. Orbs cannot be traded so if you want the ring you'll have to work together as a squad and have only one person collecting. The downside however, you can't pick your squads since you're randomly thrown into one of the instances. If you can't trust your group then it's best to use random distribution
The mobs are spawned at 21:00 server time. At that time you have up to 1 hour (usually only around 30 minutes though) to start gathering orbs by killing these boss-level mobs. Once that hour ends or the total of all instances hits 10,000 points(verify), the mobs are unsummoned, even if you're in the middle of a fight with one. When a mob dies it takes approximately 60-90 seconds for it to respawn. One major issue that makes it difficult to gather orbs is that random people run around accidentally luring (sometimes purposefully luring) mobs that are physical immune into your area
Features of the event bosses
- Some bosses debuff you
- All mobs have 0 physical defense and 0 magical resistance so debuffs are ineffective
- Some skills don't work on mobs (Sharpened Tooth, Amplify Damage)
- Some bosses have AoE
- AoE damage from bosses with AoE damage will frequently interrupt skills.
- Players below level 100 receive a that increases their Attack Level, Defense Level, and HP. The exact bonuses depend on your level, with lower levels getting higher bonuses. (The bless box vanishes when you leave CoA.)
 Heavenly Blessing
Heavenly Blessing
Heavenly Blessing
Bless Box
Lv. 16
Durability 10/10
Maximum HP +15%
Atk. Level +10
Def. Level +1
Doesn't drop on death.
Unable to be discarded
Unable to be sold
Unable to be traded
Expires when leaving area.
The bless of heaven protects the weak. - Depending on the bosses you fight, you may drain quite a bit of charm (especially without a cleric)
- Dark Messengers at each corner repair equipment on their trade list, remember to repair before the event starts
- which drop from the bosses when you kill them, cannot be traded
 Astral Orb
Astral Orb
Astral Orb
Unable to be discarded
Unable to be traded
Expires when leaving area.
Heed the call of justice! Unable to be traded
or discarded. Disappears upon leaving the instance.- If you want one person in your squad to get all of them, then create the squad using Free drop distribution, instead of Random, and then have that person collect all of the drops
- Killing a boss in your instance contributes to the point total for your instance
- The value for each boss is proportional to their HP, so a 1M HP boss gives 10 points, a 1.5M HP boss gives 15 points, and so on
- 1 point is awarded for every Netherworld Evil killed or Yama Order farmed
- The value for each boss is proportional to their HP, so a 1M HP boss gives 10 points, a 1.5M HP boss gives 15 points, and so on
Event end
When the total points for all instances hits the point maximum, CoA ends and the highest scoring instance gets reduced prices on most rewards. When the event is finished be sure to turn in your orbs at the second Dark Messenger NPC that spawns near the first. (One has an option to exit and the other has an option to trade orbs.)
The author of this guide on our Discord: Nue
Celestial Tigers
Basic information
Celestial Tigers is a PvE/PvP event, as you may have to fight other players for bosses
Time of the event
- The event takes place every Monday at 21:00 server time
Limits
- Character level 30+
Event runs in 3 main cities only
- City of the Lost
- City of the Plume
- Etherblade City
Event start
Take the quest 2 times from the Keeper of the tigers (this is important to receive the reward). NPCs appear at 21:00 server time. You can find the NPC at the following coordinates
- Etherblade City: 432 887 (opposite of the Perfect Questmaster)
- City of the Lost: 247 649 (next to the Faction Base Manager)
- City of the Plume: 328 426 (next to the Lucid NPCs)
- West Archosaur: 527 653 (Note: there are no mobs or bosses around Archosaur)
Main phases and stages
Phase 1 – Tiger Minions
Tigers spawn outside the 3 cities Goal: Kill minions to earn Contribution Points Minions may have certain immunities (physical/magic). Switch skills accordingly Dig up Tiger Herbs near spawns for bonus points
Phase 2 – Celestial Tigers
After enough minions die, Heavenly and Demonic Tigers spawn Each city gets 2 bosses (1 Heavenly, 1 Demonic) Everyone who deals damage gets a share of Contribution Points Big source of points: focus on bosses if you can survive
Boss Drop
- Chance of 2 items dropping - 100%
- Drop cycles - 5
- Total: 10 items
Possible drop
- 1%
 Excitement Card
Excitement Card
Excitement Card
Price 5,000,000
Sell it for 5,000,000 coins. - 18%
 Ecstasy Card
Ecstasy Card
Ecstasy Card
Price 1,000,000
Sell it for 1,000,000 coins. - 1%
 Perfect·Token of Best Luck
Perfect·Token of Best Luck
Perfect·Token of Best Luck
Congratulations! Lady Luck must really like you!
Use the Gift Exchange option at any PW Boutique
Agent to redeem these tokens for a gift. - 5%
Mysterious Chip 10-Pack
Mysterious Chip 10-Pack
This pack contains 10 Mysterious Chips.
These chips will bind to you when the pack is opened.
Right-click to open this pack.
To quickly open large quantities of these packs, talk to the
Mysterious Merchant in the City of a Thousand Streams.
He accepts the following quantities:
- 50 packs for 500 Mysterious Chips
- 100 packs for 1,000 Mysterious Chips.
●Press Ctrl + X to view content. - 20%
 Perfect·Token of Luck
Perfect·Token of Luck
Perfect·Token of Luck
Congratulations! It's your lucky day!
Use the Gift Exchange option at any PW Boutique
Agent to redeem these tokens for a gift.
●Press Ctrl + H to view price history. - 20%
Mirage Celestone
Mirage Celestone
Lv. 15
Price 10,000
The most powerful medium of Chi in Perfect World.
Can be used to refine your equipment at any Elder
or trade for Dice Tickets in the Cube of Fate. - 15%
 Chienkun Stone
Chienkun Stone
Chienkun Stone
Price 100
Used for Refining equipment and Refinement Transfers.
Refining Levels will not decrease if the Refining fails.
Success rates when used as a Refining Aid item:
Refining Level 1: 66,67%
Refining Level 2: 16,67%
Refining Level 3: 6,67%
Refining Level 4: 2,67%
Refining Level 5: 1.11%
Refining Level 6: 0.55%
Refining Level 7: 0,33%
Refining Level 8: 0,18%
Refining Level 9: 0.1% - 20%
Wraith Officer's Badge
Wraith Officer's Badge
Price 100
Badge of a Wraith officer.
Take this to the Commander-in-chief to gain 25 Reputation.
Final Boss Drop
- Chance of 3 items dropping - 100%
- Drop cycles - 7
- Total: 21 items
Possible drop
- 12%
 Wraith Marshal's Stamp
Wraith Marshal's Stamp
Wraith Marshal's Stamp
Price 100
Stamp of the Wraiths marshal.
Take this to the commander-in-chief to gain 500 Reputation. - 2%
 Ten Million Big Note
Ten Million Big Note
Ten Million Big Note
Price 10,000,000
A multi-millionaire's bank note.
Can be sold for 10,000,000 coins. - 1%
 Garnet Gem
Garnet Gem
Garnet Gem
Price 10,000
A soulgem filled with mystical power.
Can be imbued to Lv.11 or higher equipment.
Imbue at a blacksmith.
To a weapon: Physical attack +75
To armor: Physical defense +125 - 1%
 Sapphire Gem
Sapphire Gem
Sapphire Gem
Price 10,000
A soulgem filled with mystical power.
Can be imbued to Lv.11 or higher equipment.
Imbue at a blacksmith.
To a weapon: Magic attack +75
To armor: Magic defense +100 - 1%
 Citrine Gem
Citrine Gem
Citrine Gem
Price 10,000
A soulgem filled with mystical power.
Can be imbued to Lv.11 or higher equipment.
Imbue at a blacksmith.
To a weapon: HP +115
To armor: HP +115 - 5%
Perfect·Token of Best Luck
Perfect·Token of Best Luck
Congratulations! Lady Luck must really like you!
Use the Gift Exchange option at any PW Boutique
Agent to redeem these tokens for a gift. - 0,5%
 Lunar Glade Insignia·Ornament
Lunar Glade Insignia·Ornament
Lunar Glade Insignia·Ornament
Price 1
A rare Lunar Glade treasure commonly traded for
rings from the glade.
Use the Gift Exchange option at any PW Boutique
Agent to redeem your gift. - 3,5%
 Card Hero Token
Card Hero Token
Card Hero Token
'You are the true Card Hero!'
Trade this at the Fire Forge in Old Heaven's Tear for Wraith items.
You can also return it to the Land Elder in Old Heaven's Tear
or Tu Heng in Archosaur for a random high level equipment.
Unable to be traded or discarded. Does not drop upon death. - 12%
Mysterious Chip 10-Pack
Mysterious Chip 10-Pack
This pack contains 10 Mysterious Chips.
These chips will bind to you when the pack is opened.
Right-click to open this pack.
To quickly open large quantities of these packs, talk to the
Mysterious Merchant in the City of a Thousand Streams.
He accepts the following quantities:
- 50 packs for 500 Mysterious Chips
- 100 packs for 1,000 Mysterious Chips.
●Press Ctrl + X to view content. - 8%
Incomparable Citrine Shard 10 l
Incomparable Citrine Shard 10 l
Price 5,000
A soulgem filled with mystical power.
Can be imbued to Lv.10 or higher equipment.
Imbue at a blacksmith.
To a weapon: HP +75
To armor: HP +75 - 8%
Incomparable Garnet Shard 10 lv
Incomparable Garnet Shard 10 lv
Price 5,000
A soulgem filled with mystical power.
Can be imbued to Lv.10 or higher equipment.
Imbue at a blacksmith.
To a weapon: Physical attack +50
To armor: Physical defense +85 - 8%
Incomparable Sapphire Shard 10
Incomparable Sapphire Shard 10
Price 5,000
A soulgem filled with mystical power.
Can be imbued to Lv.10 or higher equipment.
Imbue at a blacksmith.
To a weapon: Magic attack +50
To armor: Magic defense +70 - 0,5%
 Sign of Bravery
Sign of Bravery
Sign of Bravery
Price 1,000
Sign of the King: Bravery!
Requisite Lv.: 90
You can exchange it for 220000 Spirit from the Sage Messenger.
Unique materials are always wanted for making legendary items! - 3%
Dragon Orb (6 Star)
Dragon Orb (6 Star)
Price 100
100% chance to successfully increase an item's refinement level by 1.
Can be used to make higher rank Dragon Orbs at a Jewelcraftsman.
Maximum refinement level: +6 - 1%
 Dragon Orb (7 Star)
Dragon Orb (7 Star)
Dragon Orb (7 Star)
Price 100
100% chance to successfully increase an item's refinement level by 1.
Can be used to make higher rank Dragon Orbs at a Jewelcraftsman.
Maximum refinement level: +7 - 0,2%
 Dragon Orb (8 Star)
Dragon Orb (8 Star)
Dragon Orb (8 Star)
Price 100
100% chance to successfully increase an item's refinement level by 1.
Can be used to make higher rank Dragon Orbs at a Jewelcraftsman.
Maximum refinement level: +8 - 25%
 Token of Luck Pack
Token of Luck Pack
Token of Luck Pack
Contain x25 Perfect Token of Luck
Right-click to open.
●Press Ctrl + X to view content. - 8,3%
 Chest of Coins
Chest of Coins
Chest of Coins
Contains 600,000 coins! (excluding server rates). but you'll need a Perfect Hammer to open it!
Rumors are circulating that with a 1% chance, you can get a 'Ten Million Big Note'!
●Requirements to open: - Item(s): Perfect Iron Hammer x1
●Press Ctrl + X to view content.
Rewards
Must earn 4,000+ Contribution Points to qualify Rewards are distributed by ranking
- Top contributors get better packs
- Everyone meeting the requirement gets something
Tips
- Team up for bosses — soloing is inefficient
- Always turn in your directive/mailbox reward before time runs out
The author of this guide on our Discord: Lucifer
Cube of Fate
Basic information
Cube of Fate consists of 50 rooms, each with a challenge. The player's goal is to reach room 50 and receive a reward for completing it The location is entered through the NPC Khatru Pup To complete the cube, you need
- (taken from the NPC Khatru Pup)
 Duty Badge
Duty Badge
Duty Badge
Doesn't drop on death.
Unable to be discarded
Unable to be traded
Unable to be put into Account Stash
Is used for cube or fate.
-
Dice Ticket
Dice Ticket
Item for Cube of Fate Challenge.
Trade it for a Die. Can be made from a Mirage Celestone. - (recommended)
Do-all Card
Do-all Card
An amazing card of the cube. Can be used to trade
for Robber Card and Bully Card in Cube of Fate.
Can be taken out of Cube of Fate.
Cube rooms
Room 1 - Fate's Beginning
- Talk to the Room 1 Teleport Master in the middle of the room to trade a for a
Duty Badge
Duty Badge
Doesn't drop on death.
Unable to be discarded
Unable to be traded
Unable to be put into Account Stash
Is used for cube or fate.
. This puzzle cube will expire if you the Cube of Fate Cube of Fate
Cube of Fate
Cube of Fate
Doesn't drop on death.
Unable to be discarded
Unable to be sold
Unable to be traded
Expires when leaving area.
Unable to be put into Account Stash
A key item for the Cube of Fate Challenge.
Room 2 - Chest of Mystery
- Dig 5 Boxes for Cube Nectar
Room 3 - Slaughterhouse
- Kill the 5 monsters assigned to you
Room 4 - Mice Bashing
- Kill 10 of the tombstone mobs
- This room is a popular spot for Venomancers to level their pets
Room 5 - Count the Apples
You need to count the coloured balls and submit the correct answer
Check and double check
Quest answers:
- White
- 11, 10, 9 - 11
- 10, 8, 9 - 10
- 10, 9, 11 - 11
- 10, 8, 11 - 10
- Blue
- 9, 10, 8 - 8
- 9, 10, 11 - 11
- 13, 14, 15 - 14
- 14, 13, 12 - 12
- 11, 10, 12 - 12
- 9, 14, 12 - 12
- 8, 12, 11 - 11
- Red (it's better to count on your own)
Room 6 - Open Sesame
- Kill the Mob, once it dies you have 20 seconds to talk to the NPC that spawns. Be mindful
Room 7 - Have a Listen
- Talk to the Butterfly and hug the Left wall, the mobs there are inactive
- Target mobs and see which ones have a shield and which have crossed swords. Mobs with shields are safe; they won't charge, so you can safely walk next to them
Room 8 - Try Your Luck
- You need 100k for this room. Dig 10 chests and see what you get
Room 9 - 100 Second Stand
PK enabled
- Survive 100 seconds
Room 10 - Bombs Away!
- Take the quest and get a die
- You have 10 minutes to reach room 17-22 to trade in the quest. If you fail to do so the bomb will detonate and you'll be forced back to room 1.
- Do not forget to hand in the bomb quest
- You have 10 minutes to reach room 17-22 to trade in the quest. If you fail to do so the bomb will detonate and you'll be forced back to room 1.
Room 11 - Bored
PK enabled
- Wait 3 mins
Room 12 - Choices of Fate
Chance to get
- which TPs you to room 16
 Judgment Mark: Life
Judgment Mark: Life
Judgment Mark: Life
Unable to be discarded
Unable to be traded
Expires when leaving area.
Item for Cube of Fate Challenge. Right click to move four rooms forward.
●Press Ctrl + X to view content. - which sends you back to room 11
 Judgment Mark: Death
Judgment Mark: Death
Judgment Mark: Death
Unable to be discarded
Unable to be traded
Expires when leaving area.
Item for Cube of Fate Challenge. Right click to move one room back.
●Press Ctrl + X to view content.
Room 13 - Squad of Six
- Pay 3 to proceed
Dice Ticket
Dice Ticket
Item for Cube of Fate Challenge.
Trade it for a Die. Can be made from a Mirage Celestone. - or form a squad of six people
Room 14 - I Don't Wanna Leave
PK enabled
- Trade 4 to proceed
Do-all Card
Do-all Card
An amazing card of the cube. Can be used to trade
for Robber Card and Bully Card in Cube of Fate.
Can be taken out of Cube of Fate. - or kill another player in the room and hand in to the NPC that spawns
Room 15 - Mystical Messenger
- Kill mobs for
Mysterious Chip
Mysterious Chip
Doesn't drop on death.
Unable to be discarded
Unable to be traded
Unable to be put into Account Stash
Collect to trade special items at Mysterious Merchant's.
Unable to be traded among players or discarded. Does not drop upon death. - or Direct pass
Room 16 - Fight The Demon
- Fight the mob
- or Pay 3 to pass
Dice Ticket
Dice Ticket
Item for Cube of Fate Challenge.
Trade it for a Die. Can be made from a Mirage Celestone.
Room 17 - Ecstasy or Sadness
- Pay 100k to take this quest. Dig 10 chests and see what you get
Room 18 - Not Enough Yet
- Trade 1 for the remaining
Do-all Card
Do-all Card
An amazing card of the cube. Can be used to trade
for Robber Card and Bully Card in Cube of Fate.
Can be taken out of Cube of Fate. Robber Card
Robber Card
Robber Card
Expires when leaving area.
Quest item for Cube of Fate Challenge.
Room 19 - Happy Hold-up
- 5 free
Dice Ticket
Dice Ticket
Item for Cube of Fate Challenge.
Trade it for a Die. Can be made from a Mirage Celestone.
Room 20 - Another Choice of Fate
You will get either
- to send you to room 25
Judgment Mark: Life
Judgment Mark: Life
Unable to be discarded
Unable to be traded
Expires when leaving area.
Item for Cube of Fate Challenge. Right click to move four rooms forward.
●Press Ctrl + X to view content. - to send you back to room 18
Judgment Mark: Death
Judgment Mark: Death
Unable to be discarded
Unable to be traded
Expires when leaving area.
Item for Cube of Fate Challenge. Right click to move one room back.
●Press Ctrl + X to view content.
Room 21 - Beast Hunter
- You have 2 minutes to kill 2 monsters
- Be sure to kill the correct mobs and be wary of the HP drain
Room 22 - Mystical Messenger
PK enabled
- Kill mobs for
Mysterious Chip
Mysterious Chip
Doesn't drop on death.
Unable to be discarded
Unable to be traded
Unable to be put into Account Stash
Collect to trade special items at Mysterious Merchant's.
Unable to be traded among players or discarded. Does not drop upon death. - or Direct Pass
Room 23 - Real or Fake
- Pick and kill one mob, it'll either be easy or annoying
Room 24 - Consequence
- Dig the required number of boxes and then choose how many boxes the next player will dig
Room 25 - Dragon Gate
- Take the quest and then run diagonally across the hall to the opposite corner, being careful not to get yeeted
Room 26 - Death Judge
PK enabled
- Dig 5 Doom Chests whilst avoiding the slow-ass mob. Holy Path is advised
Room 27 - Try to Listen EX
- Talk to the butterfly
- Turn up your game sound and slowly approach the mobs, if they make a simmering flame noise then they are dangerous. Find the silent one and progress forwards. Do this Twice
- Or target mobs and see which ones have a shield and which have crossed swords. Mobs with shields are safe; they won't charge, so you can safely walk next to them
Room 28 - Count the Apples EX
You need to count the coloured balls and submit the correct answer
Check and double check.
- White
- 10, 09, 11 - 11
- 10, 08, 11 - 10
- 10, 08, 09 - 10
- 11, 10, 09 - 11
- Blue
- 13, 14, 15 - 14
- 14, 13, 12 - 12
- 11, 10, 12 - 12
- 09, 14, 12 - 12
- 08, 12, 11 - 11
- 09, 10, 11 - 11
- Red
- 14, 13, 12 - 12
- If another option comes up, you must count the red balls yourself
Room 29 - Slaughterhouse EX
- Kill 5 mobs
Room 30 - 100 Second Stand EX
PK enabled
- Survive 100 seconds
Room 31 - Mystical Messenger
- Kill mobs for
Mysterious Chip
Mysterious Chip
Doesn't drop on death.
Unable to be discarded
Unable to be traded
Unable to be put into Account Stash
Collect to trade special items at Mysterious Merchant's.
Unable to be traded among players or discarded. Does not drop upon death. - or Direct pass
Room 32 - Very Bored
PK enabled
- Wait 5 minutes
Room 33 - Monster Trapper
PK enabled
- You have 2 minutes to kill 2 monsters
- Be sure to kill the mobs you've been assigned and watchout for the HP drain
Room 34 - Steadfast
- Trade 4 for the Die
Do-all Card
Do-all Card
An amazing card of the cube. Can be used to trade
for Robber Card and Bully Card in Cube of Fate.
Can be taken out of Cube of Fate. - or kill another player in the same room and handin once the NPC spawns
Room 35 - Life Diverged, Again
PK enabled
Take the quest, you will either get
- and be teleported to room 41
Judgment Mark: Life
Judgment Mark: Life
Unable to be discarded
Unable to be traded
Expires when leaving area.
Item for Cube of Fate Challenge. Right click to move four rooms forward.
●Press Ctrl + X to view content. - and be teleported to room 32
Judgment Mark: Death
Judgment Mark: Death
Unable to be discarded
Unable to be traded
Expires when leaving area.
Item for Cube of Fate Challenge. Right click to move one room back.
●Press Ctrl + X to view content.
Room 36 - Crazy Chest
PK enabled
- Dig 10 boxes
Room 37 - Great Luck
- Pay 200k to take the quest and see what you get
Room 38 - Dragon Gate EX
Do not run diagonally across the room like last time. Follow the guide:
To make it easier to explain how to get through the room, let's introduce some symbols
- Cockroach #1 (runs along the right wall, along the first row of bombs)
- Cockroach #2 (runs in a circle, along the second row of bombs) - it's basically harmless if you run close to the wall, but it's better to know where it is
So, take the quest from the NPC at the entrance and wait until Cockroach #1 runs up to you, turns around, and runs back. If Cockroach #2 isn't nearby, follow the first one to the corner and stop there to watch for the first one to run back. Once it's done, run on to the NPC. You'll definitely not encounter anyone along the way. Turn in the quest to the NPC, and that's it, the room is complete
You can stand in the corner as long as you like; the cockroach won't reach you, and neither will the bombs
Room 39 - Consequences II
- Dig the required boxes and then choose how many boxes the next player must dig
Room 40 - Sadness or Ecstasy
- Pay 100k and dig 10 boxes. See what you get
Room 41 - Squad of Three
- Pay 10
Dice Ticket
Dice Ticket
Item for Cube of Fate Challenge.
Trade it for a Die. Can be made from a Mirage Celestone. - or orm a squad of 3
Room 42 - Mystical Messenger
- Kill mobs for
Mysterious Chip
Mysterious Chip
Doesn't drop on death.
Unable to be discarded
Unable to be traded
Unable to be put into Account Stash
Collect to trade special items at Mysterious Merchant's.
Unable to be traded among players or discarded. Does not drop upon death. - or Direct Pass
Room 43 - Take Down the Demon
- Fight the mob or Pay 10 to pass
Dice Ticket
Dice Ticket
Item for Cube of Fate Challenge.
Trade it for a Die. Can be made from a Mirage Celestone.
Room 44 - Bomber Mania
- Take the quest, you have 10 minutes to reach room 50 and defuse the bomb
- Do not forget to defuse the bomb before accepting your Room 50 prize
Room 45 - Open Sesame...Please?
PK enabled
- Kill the mob and talk to the NPC before it de-spawns
Room 46 - Still Not Enough
- Take the quest, trade 2 for the remaining
Do-all Card
Do-all Card
An amazing card of the cube. Can be used to trade
for Robber Card and Bully Card in Cube of Fate.
Can be taken out of Cube of Fate. Bully Card
Bully Card
Bully Card
Expires when leaving area.
Quest item for Cube of Fate Challenge.
Room 47 - The Final Stand
PK enabled
- Survive for 100 seconds
- or Pay 8 to pass
Do-all Card
Do-all Card
An amazing card of the cube. Can be used to trade
for Robber Card and Bully Card in Cube of Fate.
Can be taken out of Cube of Fate.
Room 48 - Chest of Memories
PK enabled
- Dig 15 boxes
Room 49 - Prize Raid
- Kill mobs for and XP
Mysterious Chip
Mysterious Chip
Doesn't drop on death.
Unable to be discarded
Unable to be traded
Unable to be put into Account Stash
Collect to trade special items at Mysterious Merchant's.
Unable to be traded among players or discarded. Does not drop upon death.
Room 50 - Fate's End
- Congrats! Collect your Reward!
The author of this guide on our Discord: heliodor
Froscovered City
Basic information
- Frostcovered City is a dungeon located in the northwest corner. It's a popular place for characters to level due to the high experience from bosses and monsters and the ability to rerun the dungeon with no limitations. Only the squad leader needs to be inside the dungeon to activate it. To activate the dungeon, the squad leader must talk to Lin Yan at the beginning of the dungeon and take the quest "Open the Gate"
- Lin Yan also offers an optional quest "A Daring Rescue" which is only available to players that are level 75 or higher. This quest is required to spawn the optional boss Cyclotra Styren, and rewards players with the item , half of the items required to receive an item reward at the end of the dungeon
 Faithfullness
Faithfullness
Faithfullness
Price 1
Doesn't drop on death.
Unable to be discarded
Unable to be traded
The proof of your Faithfulness in Frostcovered City.
Together with your Sincerity, you can exchange for a reward at the Frostcovered Elder!
- Lin Yan also offers an optional quest "A Daring Rescue" which is only available to players that are level 75 or higher. This quest is required to spawn the optional boss Cyclotra Styren, and rewards players with the item
These classes are the most ideal for the dungeon:
- Barbarian: for tanking, or a similar class that can pull and tank a lot of mobs such as a Blademaster
- Cleric: for healing, purifying, and resurrecting
- Debuffers: Blademasters, Venomancers
- Classes capable of using AoEs: Archers, Wizards
In Frostcovered City, there are several closed doors blocking your way through the dungeon. They can mostly be opened by killing Glacial Shades, while other doors must be opened by killing the bosses in the dungeon.
Tips
- For tanks: Know how many mobs you're capable of tanking at once. Many mobs in the dungeon do magic damage, so pulling too many can kill you (and the rest of the squad) quickly. Usually, you will pull mobs to every Glacial Shade. For barbarians, use the skills Bestial Rage, Invoke the Spirit, Roar, and Sunder as a basic combo when finishing your mob pull
- For clerics: Be careful of when you heal the tank. If you heal while they are pulling mobs, then those mobs will attack you instead. Usually it is enough to use Ironheart Blessing a few times before the tank begins to pull. Chromatic Healing Beam is usually enough for most groups of mobs but some tougher groups may require Regeneration Aura (BB). Bosses will interrupt BB, however, and many of them have tactics that require purifying or other such support
- For damage dealers: Depending on your tank and your ability to survive, do be careful of how much damage you deal in case you accidentally steal aggro of mob groups from the tank
Items you shouldn't go without:
- Stock on guardian charms (just in case)
- Pots
- Arrows (archers)
- and most importantly always have exp items on hand ()
[Book of Knowledge]
[Book of Knowledge]
Doesn't drop on death.
Unable to be discarded
Unable to be traded
Unable to be put into Account Stash
By opening the book, you will gain insight for a certain period of time and receive special effects:
+100% to experience and spirit gain from killing monsters.
+5% to experience and spirit gain from completing quests.
The book's effect is unique and does not stack with other experience and spirit gain sources.
Duration: 1 hour.
Right-click to activate.
The duration of multiple item uses stacks.
●Requirements to open: - History Level: 80
●Press Ctrl + X to view content.
Bosses
Thunderclaw
- Like many bosses, it mainly does ranged magic attacks that will reduce the player's movement speed. It will also use a short bleed damage-over-time debuff. It will occasionally spawns three circles on random players that deal 5000 damage each after 5 seconds, regardless of your defense. Thunderclaw does not drop any items
Diabolic Shocktrooper
- The Diabolic Shocktrooper mainly deals ranged magic damage. On occasion it will put players to sleep or use the Occult Ice skill on players. The Occult Ice skill deals damage over time which can be deadly to weaker squads, but can be purified. Once the boss is killed, Frost Lord Holan will reappear in its place and two groups of Frost Bishops and Ice Sirens will spawn in the same room
Cyclotra Styren
- is an optional boss and does not need to be killed to complete Frostcovered City. To summon this boss one player must have the quest "A Daring Rescue", meaning you will need at least one level 75+ player in your squad. To summon the boss, talk to Shiner Nin in the room. All players that wish to receive the reward chest at the end of the dungeon should talk to Shiner Nin. After a short period of time, the Cyclotra Styren will appear at the entrance of the room and walk to Shiner Nin.
Cyclotra Styren itself does not have many tactics outside of ranged magic attacks and an AoE bleed damage-over-time skill, but it will spawn a Glacix Dragoon once at the beginning of the fight and once when it has roughly 1/3 HP remaining. Glacix Dragoons can AoE stun players after being damaged a bit, but will only do it once.
After Cyclotra Styren dies, Lin Yan will appear next to Shiner Nin. Players can hand in their "A Daring Rescue" quest at this NPC to receive the item
Faithfullness
Faithfullness
Price 1
Doesn't drop on death.
Unable to be discarded
Unable to be traded
The proof of your Faithfulness in Frostcovered City.
Together with your Sincerity, you can exchange for a reward at the Frostcovered Elder!
Dreadindra
- He is capable of dealing melee ranged physical damage. On occasion he will put players to sleep. He will sometimes call a Frost Bishop to attack players, which are capable of freezing players in place. Dreadindra will also randomly aggro on players and can purge the squad. He can also deal AoE damage equal to a certain percentage of your health, so AoE heals are recommended. The primary tank should hold the boss while the rest of the squad primarily focuses on the Frost Bishops when they spawn, and deal damage to the boss in between spawns.
Asoteric Runewolf
- Players should avoid using attacks that interrupt the boss's channelling as it can trigger his mechanics early,. On occasion the boss will stop moving and will start shouting "SUPER..." "POWERFUL..." "MIGHTY..." "WHIRLING..." "SLASH!". Players should run away from the boss as once he says "SLASH!" he will use multiple AoE attacks that deal quite a bit of damage to players and is fatal for more traditional squads. Once he begins to move again, it is safe to move back to him and continue killing him. His other attacks include a ranged magic attack that reduces movement speed, an AoE that deals damage equal to a certain percentage of your health, and a random silence on players. Occasionally he will also increase his magic attack for a short time or use a frenzy buff which increases his attack but lowers his defense.
Messenger of Fear
- does AoE sleep and AoE damage. After you killed this boss the NPC Yi Lam appears. Talk to him and he will teleport you near next boss. If you are below level 85 you need to walk.
Oceania Master Do NOT use AoE skills.
- Stands in a big room filled with mobs. The tank holds the boss. Don't hit the minion that spawns next to the boss, telling you to try hit him. Ignore this minion. If you kill the minion he does a severe AoE killing most people in your squad. Kill any hands that spawn within 5 seconds before they clap or they kill almost everyone. Most players will kill the hands that spawn near them on their own, but putting a player in charge of killing them is also an option.
Do NOT talk to the NPC yet!
Frozen Heads
- After the boss: For the mobs in the room, a tank follows a pattern to avoid the harpies and instead drags all the mobs to the squad. The squad follows the same skill combos used when pulling mobs to a shade
- Level 75+: After you kill Oceania Master boss the NPC Celestial Sister appears, talk to her after the squad has killed all the mobs in the room. Hit as many of the Frozen Heads you can, they give EXP, and afterwards the NPC gives you a second quest item
 Sincerity
Sincerity
Sincerity
Price 1
Doesn't drop on death.
Unable to be discarded
Unable to be traded
The proof of your Sincerity in Frostcovered City.
Together with your Faithfulness, you can exchange for a reward at the Frostcovered Elder!
Decaying Fragrance
- This one does the axe debuff like one of the last bosses in FB69. Purify the debuff. The tank holds the boss. AoE stuns
Asoteric Runephoenix
- Shoot him if ranged, run to lower him so everyone in the squad can hit him. He AoE seals, does damage, and drains life. Just DD, cleric team heals. A venomancer may use Soul Degeneration when Amplify Damage is on cooldown because this boss has a great HP regeneration rate. After the phoenix dies, you need to destroy the remains Blazing Phoenix Soul before it disappears
- After the boss: The last few mobs are the dragons that the FC boss Cyclotra Styren spawns, meaning they will stun. Do the mobs one group at time or use a if you want pull them all to the last boss room
 Vacuity Powder
Vacuity Powder
Vacuity Powder
Requisite Lv. 75
Price 1,000
Makes player immune to all movement debuffs for the next 20 seconds.
Holeen
- Lure one of the smaller Holeen (if you have a veno) and kill it. If you don't have a veno focus one only and ignore the other. After he's dead Holeen Champion of Fientazzar spawns. He random aggros, seals, AoEs, and buffs himself at around 30% of his HP. AoE heals are used and the venomancer should Purge the boss as soon as he buffs himself
- Level 75+: Talk to the NPC Frost Elder. For the and
Sincerity
Sincerity
Price 1
Doesn't drop on death.
Unable to be discarded
Unable to be traded
The proof of your Sincerity in Frostcovered City.
Together with your Faithfulness, you can exchange for a reward at the Frostcovered Elder!he'll give you a Chest of Faith containing a random gift. (I believe it's custom to shards on here only, not certain if any chance for anything else)
Faithfullness
Faithfullness
Price 1
Doesn't drop on death.
Unable to be discarded
Unable to be traded
The proof of your Faithfulness in Frostcovered City.
Together with your Sincerity, you can exchange for a reward at the Frostcovered Elder!
The author of this guide on our Discord: Nue
How to obtain R6 weapon?
You need
- 35,000 reputation
- Items
- x10
Badge of Dexterity
Badge of Dexterity
Price 500
To raise confidence!
Requisite Lv: 1
Exchange it for 4000 Spirit from the Messenger of Sages
You can also exchange 10 badges for one sign.
Can be exchaned at NPC 'Messenger of the Sages'- Obtained from Cube of Fate (daily)
- x10
Badge of Speed
Badge of Speed
Price 500
The speed of wind is the pursuit of everybody!
Requisite Lv: 1
Exchange it for 2000 Spirit from the messenger of sages
You can also exchange 10 badges for one sign.
Can be exchaned at NPC 'Messenger of the Sages'- Obtained during the Snake Isle Race event (daily 04:00/15:00/19:30)
- x10
Badge of Endurance
Badge of Endurance
Price 500
Endurance makes you dependable!
Requisite Lv: 60
Exchange it for 6000 Spirit from the Messenger of Sages
You can also exchange 10 badges for one sign.
Can be exchaned at NPC 'Messenger of the Sages'- Obtained at the Archosaur Arena event (Tues/Friday 18:00 and Sat 16:00)
- x10
Badge of Wisdom
Badge of Wisdom
Price 1,000
Wisdom is the most valuable of virtues!
Requisite Lv: 1
Exchange it for 1000 Spirit from the Messenger of Sages
You can also exchange 10 badges for one sign.
Can be exchaned at NPC 'Messenger of the Sages'- Obtained at the Archosaur Arena event (Tues/Friday 18:00 and Sat 16:00)
- x10
Badge of Courage
Badge of Courage
Price 500
Never surrender
Requisite Lv: 80
Exchange it for 8000 Spirit from the messenger of sages
You can also exchange 10 badges for one sign.
Can be exchaned at NPC 'Messenger of the Sages'- Obtained at the Archosaur Arena event (Tues/Friday 18:00 and Sat 16:00)
- x10
Badge of Strength
Badge of Strength
Price 500
Strength makes you supreme!
Requisite Lv: 1
Exchange it for 2000 Spirit from the messenger of sages
You can also exchange 10 badges for one sign.
Can be exchaned at NPC 'Messenger of the Sages'- Obtained at the Archosaur Arena event (Tues/Friday 18:00 and Sat 16:00)
- x10
Badge of Bravery
Badge of Bravery
Price 500
Being fearless makes you invincible!
Requisite Lv.: 90
Exchange for 2000 Spirit from the Messenger of Sages
You can also exchange 10 badges for one sign.
Can be exchaned at NPC 'Messenger of the Sages'- Boutique (500gold for sign) or 250 Insignias each from Tigers (mon at 21:00)
Use
- MG/EP/WF: endgame weapon 10/10
- EA: good crossbow 8/10
- BM/WB: not recommended 3/10
The author of this guide on our Discord: Cloud
Refining Guide
Refining Bonus
Refining specific equipment has various effects depending on the type of equipment
- Melee/Ranged Weapon - Physical Attack Upgrade
- Magic Weapon - Magic Attack Upgrade
- Physical Attack Ring - Physical Defense Upgrade
- Magic Attack Ring - Magic Defense Upgrade
- P.Def Ornament - Physical Defense Upgrade
- M.Def Ornament - Magic Defense Upgrade
- Evasion Ornament - Evasion Upgrade
- Robes - Maximum HP Increase
- Armor - Maximum HP Increase
The actual amount of a refinement's added benefit comes from additional two factors. The base refinement bonus of the item and how high you refine it. The base refinement bonus is equal to the added stats received from refining an item to +1
In general, the bonus is higher for higher grade gear but this is not always the case
The level of refinement determines the multiple of this base refinement bonus you will receive. For example, at +6 you receive 7.55 times as much benefit as you get at +1. The full chart is found below
Refine Multipliers
| Lvl | Bonus |
|---|---|
| +1 | 1x |
| +2 | 2x |
| +3 | 3.05x |
| +4 | 4.3x |
| +5 | 5.75x |
| +6 | 7.55x |
| +7 | 9.95x |
| +8 | 13x |
Dragon Orbs
Dragon orbs are an item that can be bought through the Boutique, bought from other players or acquired through various events
Using these, alongside the Mirage Celestones, will ensure that your refining never fails. Dragon Orbs not from the Boutique are bound, and cannot be combined to make higher grade orbs
You must use the dragon orb for the current refine or higher or it will not work
Using a 1* dragon orb when trying to refine to +2 will not have a 100% success rate, you will need to use a 2* dragon orb or above
If you want to refine a piece of gear to +6 you would need a 1, 2, 3, 4, 5, and a 6 star orb to get there with a 100% success rate
1* Orbs Needed for Higher Refines
| Orb | 1* Orbs Needed | Total Needed |
|---|---|---|
| 1* | 1 | 1 |
| 2* | 4 | 5 |
| 3* | 10 | 15 |
| 4* | 25 | 40 |
| 5* | 60 | 100 |
| 6* | 130 | 230 |
| 7* | 215 | 445 |
| 8* | 405 | 850 |
Refining Without Dragon Orbs
The basic chances of refining success are as follows
| Refine | Mirage | Tienkang | Tisha | Chienkun |
|---|---|---|---|---|
| +1 | 50% | 65% | 53.5% | 100% |
| +2 | 30% | 45% | 33.5% | 25% |
| +3 | 30% | 45% | 33.5% | 10% |
| +4 | 30% | 45% | 33.5% | 4% |
| +5 | 30% | 45% | 33.5% | 1.67% |
| +6 | 30% | 45% | 33.5% | 0.77% |
| +7 | 30% | 45% | 33.5% | 0.47% |
| +8 | 28% | 43% | 31.5% | 0.25% |
- If refining fails, the item loses all previous refining and reverts back to +0
- prevent the item from dropping more than 1 refining level if refining fails
 Tisha Stone
Tisha Stone
Tisha Stone
Price 100
Useful in refining.
Increases refining chance.
Refining level decreases by 1 if refining fails. - prevent the item from dropping any level at all with failure
Chienkun Stone
Chienkun Stone
Price 100
Used for Refining equipment and Refinement Transfers.
Refining Levels will not decrease if the Refining fails.
Success rates when used as a Refining Aid item:
Refining Level 1: 66,67%
Refining Level 2: 16,67%
Refining Level 3: 6,67%
Refining Level 4: 2,67%
Refining Level 5: 1.11%
Refining Level 6: 0.55%
Refining Level 7: 0,33%
Refining Level 8: 0,18%
Refining Level 9: 0.1%
Refining Folklore
Duke Blacke sometimes gives players advice on refining. For example, one of his rumors states that refining when nobody else is around improves refining rates, while another suggests that logging out and restarting your computer also improves the refining rate
Many of his rumors give advice on specific NPCs to use when attempting to refine to a particular level. Note, however, that the Officer NPCs that Duke Blacke refers to can only be used by players who belong to the faction that controls the territory
Rumoured NPCs
- +1 The Harshlands
- +2 The Frozen Path
- +3 Avalanche Canyon, Thousand Wood Ridge, Windswept Grasslands, Courage Path, Land of Buried Bones
- +4 Haunted Path, Tradewind Village, The Great Lake, South Barrier Mountains
- +5 City of Misfortune, Shining Tide Woods, Stairway to Heaven, The White Ridge
- +6 Ancient Wall, Dragon Wilderness, Valley of the Hidden Orchid, Black Mountain
- +7 Broken Plain, Silk Ridge, Peach Blossom Grove, Ridge of the Dreaming Cloud
- +8 Ancient Peak, Wellspring Village, Deserted Sea
Happy Refining, and may the odds be ever in your favour
The author of this guide on our Discord: heliodor